Get Started with RT-Thread Smart OpenSource Microkernel Operating System!
RT-Thread Smart is an open-source microkernel operating system that is aimed primarily at mid to high-end processors with MMU (Memory Management Unit), providing a more competitive operating system-based software platform for different industries. RT-Thread Smart is positioned as a professional high-performance micro-kernel operating system for real-time applications, to benefit the industries in Security, Industrial Control, Onboard Devices, Consumer Electronics, and so on.
RT-Thread Smart Architecture
RT-Thread Smart separates the whole system into kernel mode and user mode on the basis of the hardware platform by taking advantage of the MMU and System Call method and divides the address space for each mode (32-bit system provides 4G address space).
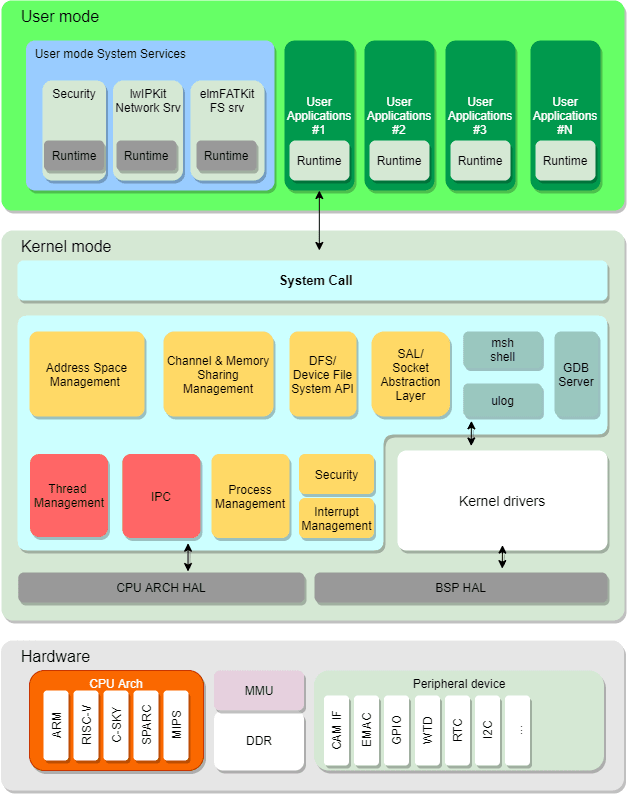
The RT-Thread Smart kernel includes the basic functionality and supports custom tailor as well. The RT-Thread Smart user-mode application environment uses musl libc to provide POSIX interface calls and C runtime supports, inherits RT-Thread original ecology that using scons or other build tools such as xmake, cmake, etc., and docking with RT-Thread 260+ out-of-box online software packages, as well as supporting POSIX for porting Linux applications.
This article will lead you to get started with RT-Thread Smart OpenSource Microkernel Operating System.
Software Introduction
RT-Thread Smart Software
First. Download rt-smart-20201125.zip, The rt-smart.zip package can be executed on QEMU-simulated VExpress-A9 or raspberry Pi 4B development boards to help RT-Thread developers further down on learning RT-Thread Smart.
Unzip it, and first, I’ll walk you through the document structure.

Prepare Toolchain
You’ll need to download the corresponding arm-linux-musleabi toolchain for different operating environment Linux and Windows, rt-smart package already contains a toolchain that under Linux environment.
● Linux:install_arm-linux-musleabi_for_x86_64-pc-linux-gnu.tar
● Windows:install_arm-linux-musleabi_for_i686-w64-mingw32
Download Toolchain:
https://drive.google.com/file/d/1IQgPs9u2BDc3OJsmiD-Zf6TqSMUd7sAF
Download the toolchain according to your development environment.
After downloading it, unzip and expand it into the rt-smart/tools/gnu_gcc directory, and the environmental variables set by smart-env.bat/sh in the rt-smart directory, where the toolchain path points to this directory.
Compile it on Linux and execute on the QEMU simulation environment.
Under Linux, you’ll need to install some basic environments before you can compile rt-smart. This document is taking the operations under Ubuntu16.04 environment, which is similar to other Linux versions.
Install Compile Environment
First, install some other tools and packages that you’ll need to use for compiling via some commands as shown below:
1 sudo apt-get update
2 sudo apt-get install vim scons git bzip2 net-tools
3 sudo apt-get install python-all python-all-dev
4 sudo apt-get install qemu-system-arm qemu-system-common qemu-utils
The above commands will request to install some system basic tools, python environments, scons, qemu tools, and so on.
Compile Application
1   # Enter rt-smart category
2   cd rt-smart
3
4   # Set the corresponding environment variable, compared with RT-Thread, RT-Thread Smart has RTT_CC_PREFIX environment variable
5   source smart-env.sh
6
7   # Compile user mode application
8   cd userapps
9   scons
10
11  scons: Reading SConscript files ...
12  scons: done reading SConscript files.
13  scons: Building targets ...
14  CC build/hello/main.o
15  CC build/ping/main.o
16  CC build/pong/main.o
17  CC build/vi/optparse-v1.0.0/optparse.o
18  CC build/vi/vi.o
19  CC build/vi/vi_utils.o
20  CC build/webclient/main.o
21  LINK root/bin/hello.elf
22  LINK root/bin/ping.elf
23  LINK root/bin/pong.elf
24  LINK root/bin/vi.elf
25  LINK root/bin/webclient.elf
26  scons: done building targets.
After successfully compiled, the application under userapps/apps compiles into the elf executable files and places it in the userapps/root/bin directory, which can be converted into a romfs, C language array and provide to rt-smart, so that it can be executed directly without relying on other file systems. You can use the following command lines to generate romfs and C language arrays.
1  cd userapps
2  python ../tools/mkromfs.py root ../kernel/bsp/qemu-vexpress-a9/applications/romfs.c
Compile RT-Smart Kernel
1  cd rt-smart/kernel/bsp/qemu-vexpress-a9
2  scons
3  ... ...
4  CC build/kernel/src/thread.o
5  CC build/kernel/src/timer.o
6  LINK rtthread.elf
7  arm-linux-musleabi-objcopy -O binary rtthread.elf rtthread.bin
8   arm-linux-musleabi-size rtthread.elf
9    text    data     bss     dec     hex filename
10  1219480   40652  122444 1382576  1518b0 rtthread.elf
11  scons: done building targets.
After successfully compiled, the rtthread.elf kernel file will be generated.
Simulate and Execute
Through QEMU to simulate vexpress-a9 and run it directly:
1  cd rt-smart/kernel/bsp/qemu-vexpress-a9
2  ./qemu-nographic.sh
3
4   \ | /
5  - RT -     Thread Smart Operating System
6   / | \     5.0.0 build Nov 15 2020
7   2006 - 2020 Copyright by rt-thread team
8   lwIP-2.0.2 initialized!
9   try to allocate fb... | w - 640, h - 480 | done!
10  fb => 0x61100000
11  [I/sal.skt] Socket Abstraction Layer initialize success.
12  [I/SDIO] SD card capacity 65536 KB.
13  Dir /mnt mount failed!
14  hello rt-thread
15  msh />
16  msh />/bin/hello.elf
17  msh />hello world!
Press “Ctrl+A, X” to exit QEMU. We also run the compiled application /bin/hello.elf in above and it outputs hello world!.
On the first execution, Dir /mnt mount failed! is output, this is because the qemu script generates an empty sd.bin file as a sd card given to vexpress-a9 on the first execution, therefore, sd0 needs to be formatted.
1    \ | /
2   - RT -     Thread Smart Operating System
3    / | \     5.0.0 build Nov 24 2020
4   2006 - 2020 Copyright by rt-thread team
5   lwIP-2.0.2 initialized!
6   try to allocate fb... | w - 640, h - 480 | done!
7   fb => 0x61100000
8   [I/sal.skt] Socket Abstraction Layer initialize success.
9   [I/SDIO] SD card capacity 65536 KB.
10  [I/SDIO] switching card to high speed failed!
11  Dir /mnt mount failed!
12  hello rt-thread
13  msh />mkfs sd0
14  msh />
15
16  # Ctrl + A, X to exit
17  QEMU: Terminated
18
19 bernard@fuchsia-NUC8i7BEH:
~/workspace/rt-smart/smart/kernel/bsp/qemu-vexpress-a9$ ./qemu-nographic.sh
20  \ | /
21 - RT -     Thread Smart Operating System
22  / | \     5.0.0 build Nov 24 2020
23  2006 - 2020 Copyright by rt-thread team
24  lwIP-2.0.2 initialized!
25  try to allocate fb... | w - 640, h - 480 | done!
26  fb => 0x61100000
27  [I/sal.skt] Socket Abstraction Layer initialize success.
28  [I/SDIO] SD card capacity 65536 KB.
29  [I/SDIO] switching card to high speed failed!
30  file system initialization done!
31  hello rt-thread
32  msh />
Compile on Windows and Execute on Raspberry Pi 4B
The same work can be done on Windows and executed on the qemu or Raspberry Pi 4B board, let’s check out how to make it works on the Raspberry Pi 4B.
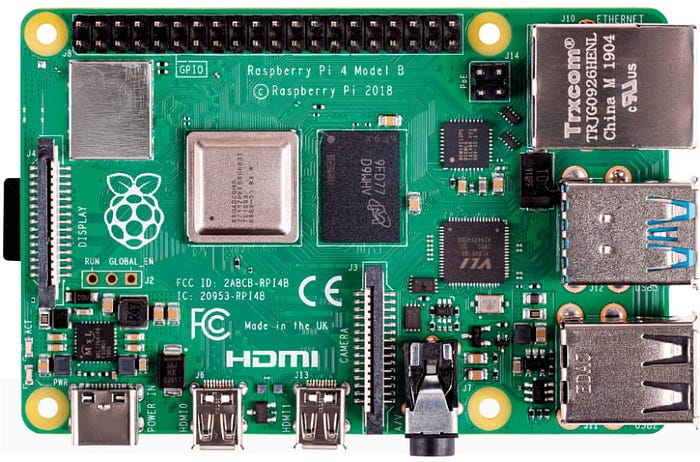
Prepare Compiling Environment
To compile RT-Thread Smart on Windows, you can use the RT-Thread Env tool:
First, check out if Env works. Because the rt-smart.zip package does not carry a toolchain in a Windows environment, it is important to download the Windows Toolchain and unzip it under rt-smart\tools\gnu_gcc as we mentioned above.
Then, open the end window of Env, switch to the root of this rt-smart code package and run smart-env.bat, it will set a certain amount of environment variables, and then the overall RT-Thread Smart development environment can be used.
1  #Enter rt-smart category, set environment variable
2  cd rt-smart
3  > smart-env.bat
Note that running the smart-env.bat setting environment here includes compiler settings, and it also sets the prefix of the toolchain, which can be entered under the Env terminal to check if the return results are effective:
1  # Check out if the return results are effective
2  > set RTT_CC_PREFIX
3  RTT_CC_PREFIX=arm-linux-musleabi-
Compile Application
When compiling the application, it is a similar method as compile on Linux:
1 #Enter userapps category to edit
2  cd rt-smart\userapps
3  scons
Compile RT-Thread Smart Kernel
1   #Enter raspberry-pi\raspi4-32 category to compile
2   cd rt-smart\kernel\bsp\raspberry-pi\raspi4-32
3   scons
4   ... ...
5   CC build/kernel/src/signal.o
6   CC build/kernel/src/thread.o
7   CC build/kernel/src/timer.o
8   LINK rtthread.elf
9   arm-linux-musleabi-objcopy -O binary rtthread.elf kernel7.img
10  arm-linux-musleabi-size rtthread.elf
11   text    data     bss     dec     hex filename
12  710780   40448   64730  815958   c7356 rtthread.elf
13  scons: done building targets.
After successfully compiled, the kernel7.img file is generated in the current directory, it is the 32-bit version of Raspberry Pi. Currently, RT-Thread Smart only supports 32-bit systems, so it is executed in 32-bit mode on the Raspberry Pi 4B.
Connect Hardware
You’ll need to prepare the following hardware and connect the serial lines to the development board, as shown in the following connection diagram:
- Raspberry Pi 4B
- SD card (32GB or less)
- USB-TTL switching serial line
- Networking cables
- TYPE-C (for power supply)
- Card Reader (for writing compiled files to SD cards)
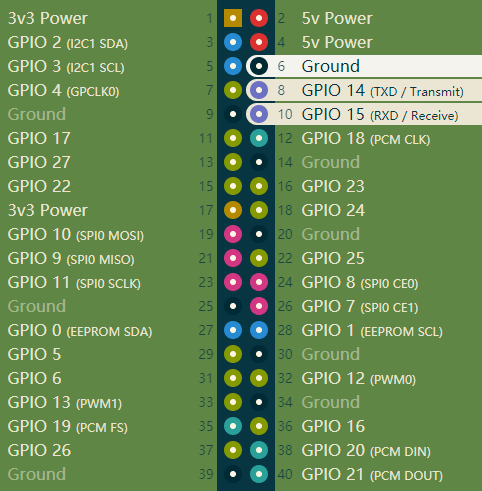
Prepare the software on the SD card
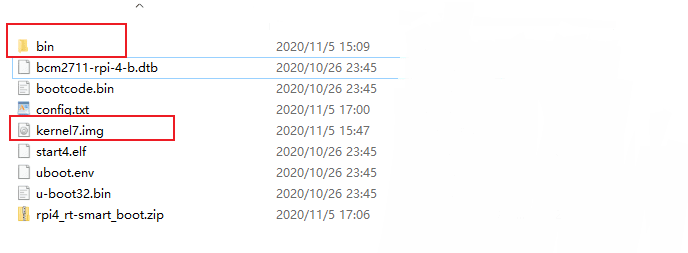
The load of the Raspberry Pi requires some boot files to be placed on the sd card. You can download the rpi4_rt-smart_boot.zip to help to load the Raspberry Pi.
https://drive.google.com/file/d/1IQgPs9u2BDc3OJsmiD-Zf6TqSMUd7sAF
The downloaded file is unzipped and placed with kernel7.img in an empty SD card root directory, as shown in the following image, where the bin folder holds the compiled executable elf files under the userapps\root\bin directory.
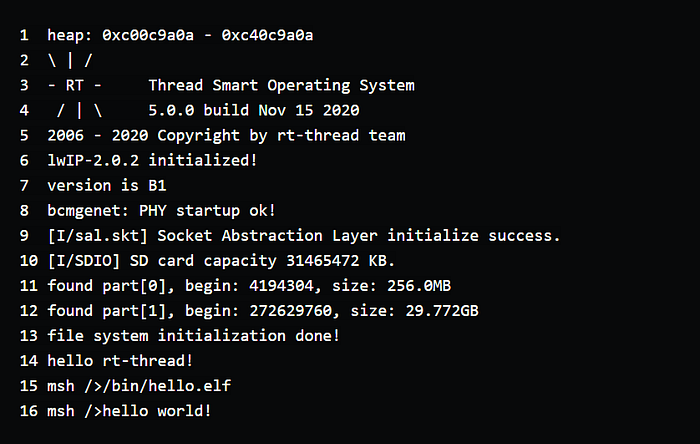
Open the serial debugging assistant and plug in the power, you can see that the program is successfully running, enter the bin directory can execute the sample program:
Contact RT-Thread if you have any ideas to share!
